
Alright, let’s be real for a second. Is there any space in the house that becomes a dumping ground faster than the garage? One day it’s a pristine space for your car, and the next, it’s a terrifying black hole where sports equipment, half-empty paint cans, and that mysterious box labeled “miscellaneous” go to die. You open the door, sigh, and quickly close it again, promising yourself you’ll deal with it “this weekend.”
Sound familiar? I’ve been there. My garage was a national monument to clutter. But then I got fed up and discovered the magical world of DIY garage storage. And let me tell you, taking control of that space is one of the most satisfying projects you’ll ever do. It’s not about achieving a sterile, museum-like showroom (unless that’s your thing, no judgment). It’s about creating a system that works for you.
So, grab a coffee, and let’s chat about the best DIY garage storage ideas that will transform your chaos into calm. These are projects I’ve tried, tested, and sometimes cursed at, but they all lead to a better-organized space.
1. The Almighty Slat Wall: Your Garage’s Best Friend
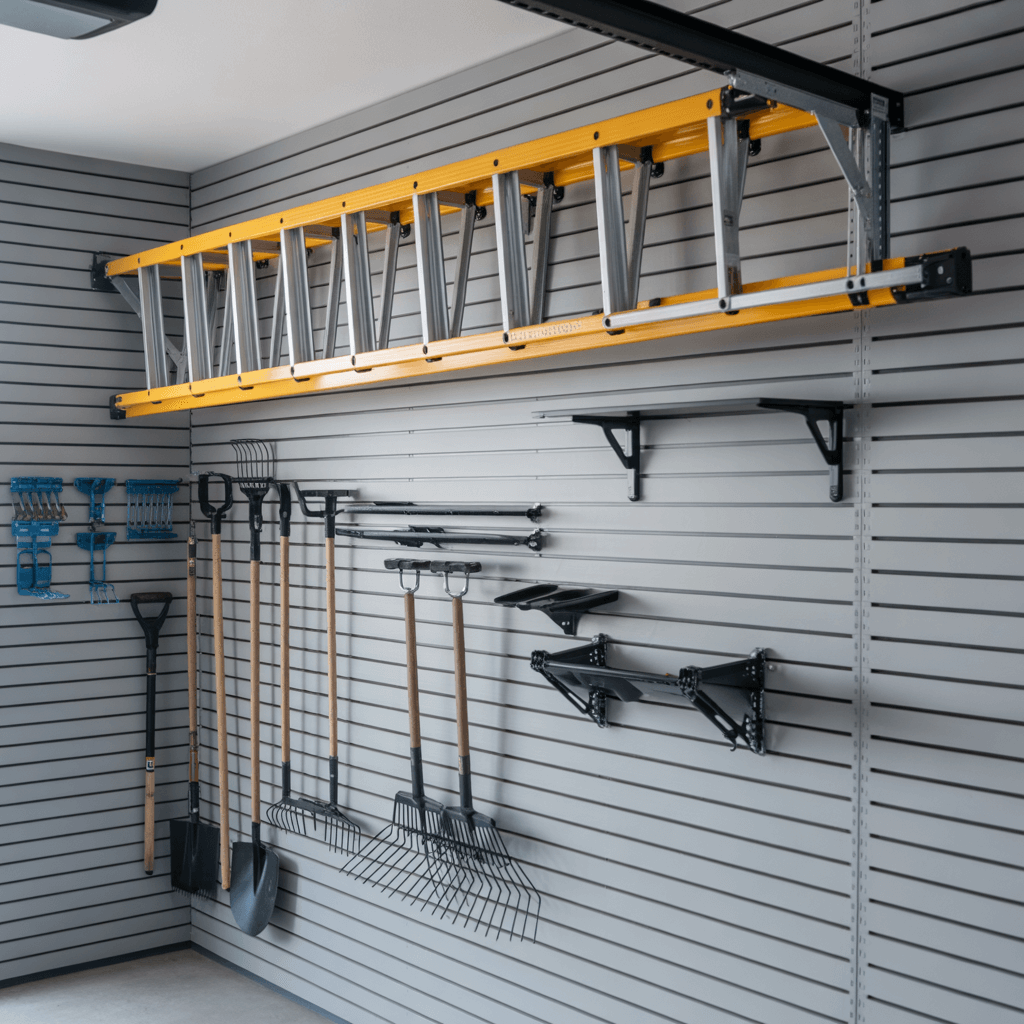
If I had to pick one storage solution to rule them all, it would be the slat wall (often called slot wall or slatwall). This stuff is the superhero of garage organization. Forget drilling a million holes in your drywall for individual hooks; a slat wall gives you a versatile, strong panel where you can hang almost anything.
Why it’s a game-changer:
The beauty is in the slots. You install the panels on your wall, and then you get a variety of accessories—brackets, hooks, bins, shelves—that simply clip in. Want to rearrange your tools? Just unclip the holder and move it. It’s like LEGOs for adults with a power drill.
How to Tackle This Project:
Materials You’ll Need: Slat wall panels (PVC or MDF), wood for furring strips, a level, a saw, and a bunch of screws.
Pro-Tip from My Mess-Up: Your garage walls probably aren’t perfectly flat. I learned the hard way that you must install furring strips first. These are just strips of wood you attach to the wall studs. Then, you screw the slat wall panels to the furring strips. This creates a sturdy, air-gapped surface that can handle serious weight and ensures your panels are perfectly vertical. Trust me on this one.
What to Hang on It: Bikes, ladders, garden tools, power tools in holders, shelving brackets for bins, and even large items like lawn chairs. The possibilities are endless.
2. Overhead Storage Racks: Claim Your Unused Airspace
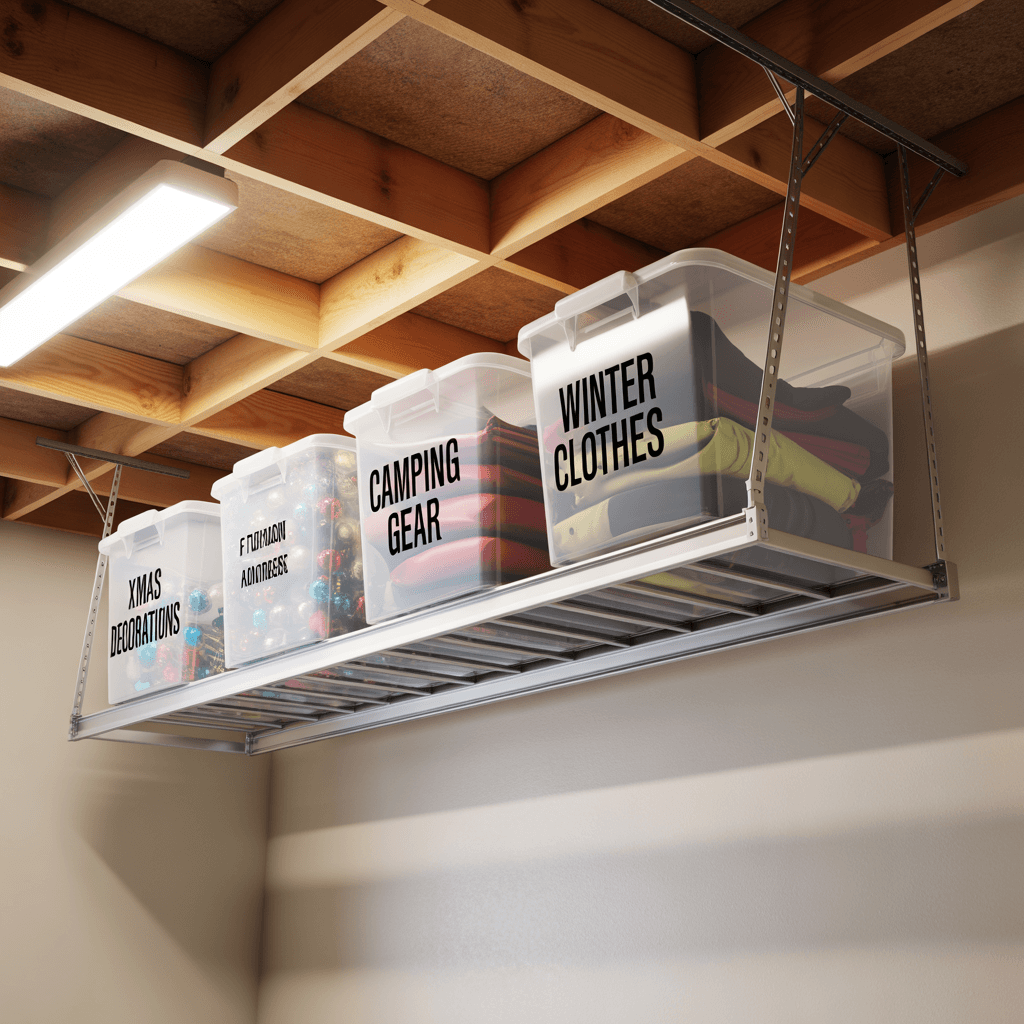
Look up. What do you see? Probably a whole lot of empty space. Your garage’s ceiling is a goldmine for storage, perfect for stashing stuff you need but don’t use every day. We’re talking seasonal decorations, camping gear, or that giant turkey roaster you break out once a year.
Why it’s a game-changer:
It gets bulky, lightweight items off the floor and out of the way, completely freeing up your valuable wall and floor space. It’s a total game-changer for making a garage feel bigger.
Safety First, Please!
This isn’t the project to wing. Overhead storage needs to be secure. You must anchor these racks into the ceiling joists. Hanging them from drywall alone is a recipe for disaster. I’m not trying to scare you, but I am trying to save your car’s windshield.
Types of Racks: You can buy pre-made metal kits that are surprisingly easy to install, or you can go full DIY and build a wooden platform suspended from joists with sturdy straps.
Weight Limit is Key: Every system has a weight limit. Respect it. This is for light-to-medium bulk, not your collection of antique anvils.
Accessibility: Think about how you’ll get stuff up and down. A small, sturdy step ladder should be part of your plan.
3. The Simple & Mighty Pegboard: A Classic for a Reason
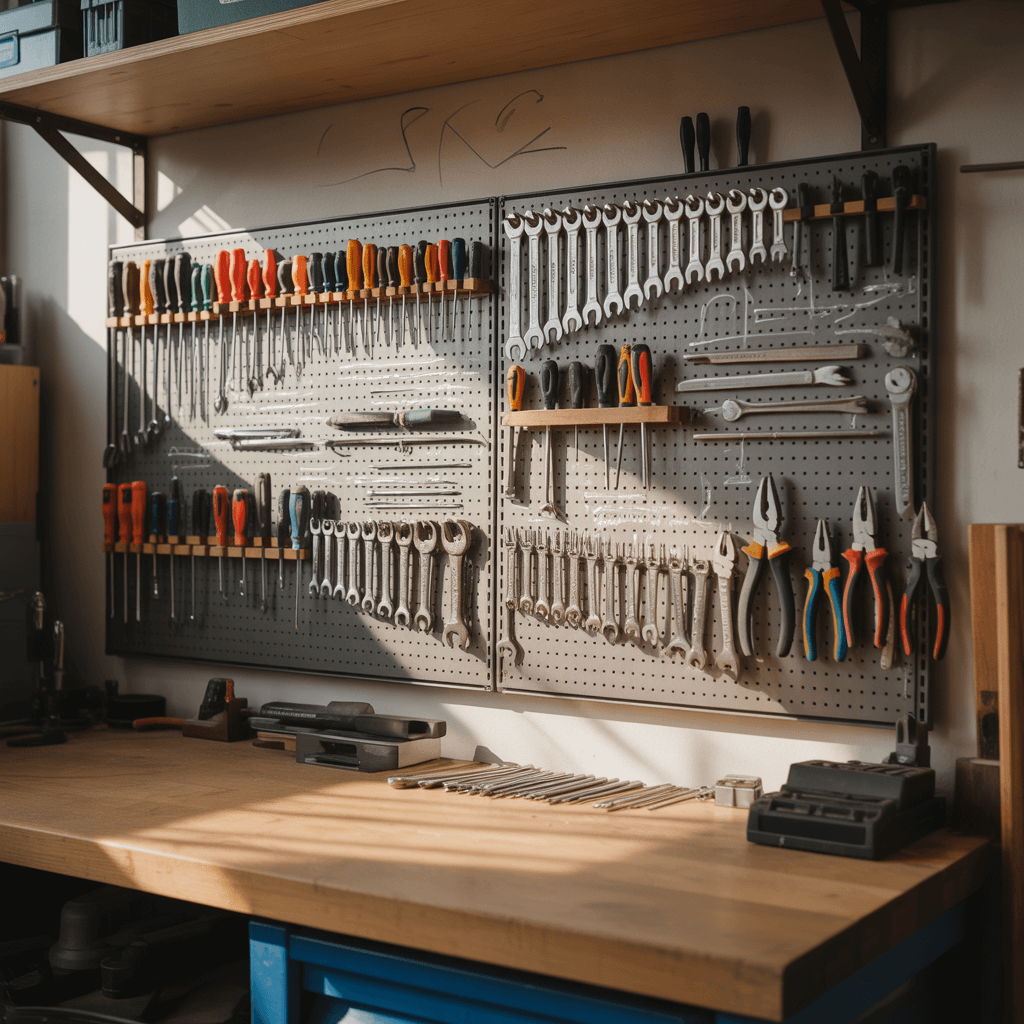
Ah, the humble pegboard. It’s the OG of workshop organization, and for good reason. It’s affordable, easy to install, and incredibly customizable. While slat walls are great for bigger, heavier items, a pegboard is perfect for your most-used hand tools.
Why it’s a game-changer:
Having all your screwdrivers, wrenches, pliers, and hammers visible and within arm’s reach is a productivity miracle. No more rummaging through a messy toolbox. It also forces you to put things back where they belong.
Making it Work Well:
The Secret to a Sturdy Pegboard: Don’t just screw it flat against the wall. Use spacers (like 1×2 strips of wood) behind it to create a gap. This allows the pegboard hooks to lock in place securely from behind. Without the gap, the hooks pop out every time you grab a tool, which is… infuriating.
Get Creative with Layouts: You can paint the pegboard a cool color before you hang it to match your garage’s vibe. Then, use a marker to outline each tool. It looks awesome and you’ll instantly know if something is missing.
What to Hang on It: Your go-to hand tools, spray paint cans, rolls of tape, scissors—anything small and frequently used.
4. DIY Shelving: Because Sometimes You Just Need a Shelf
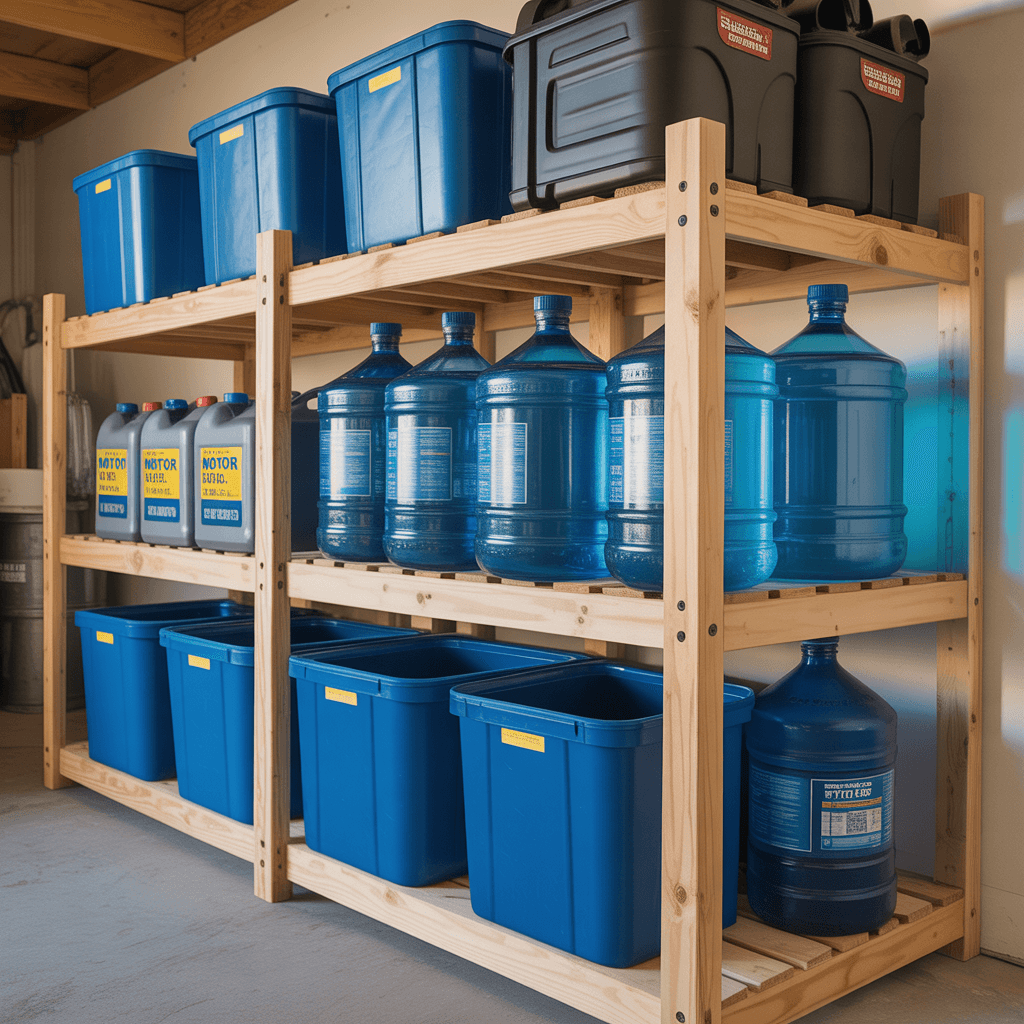
Let’s not overcomplicate things. Sometimes, what you really need is a good, sturdy shelf. While store-bought metal shelving units are fine, building your own allows you to customize the size and strength to fit your exact space and needs.
Why it’s a game-changer:
Custom-built shelves can handle serious weight. We’re talking bins full of books, your heavy-duty power tools, or cases of motor oil. They look built-in and professional when done right.
My Go-To Shelf Design: The 2×4 and Plywood Beast
This is my favorite beginner-friendly shelf design. It’s basically bomb-proof.
The Frame: Build a simple frame for each side using 2x4s. Think of it like a ladder lying on its side.
The Braces: Attach the two side frames together with more 2x4s running along the front, back, and middle. This creates the skeleton.
The Surface: Top the skeleton with a sheet of 3/4-inch plywood cut to size. You can leave it raw, stain it, or paint it.
The Best Part: You can make these shelves as tall, wide, or deep as you need. Need a shallow shelf for paint cans? No problem. Need a deep one for storage totes? Easy.
5. Magnetic Tool Strips: The Underrated Genius
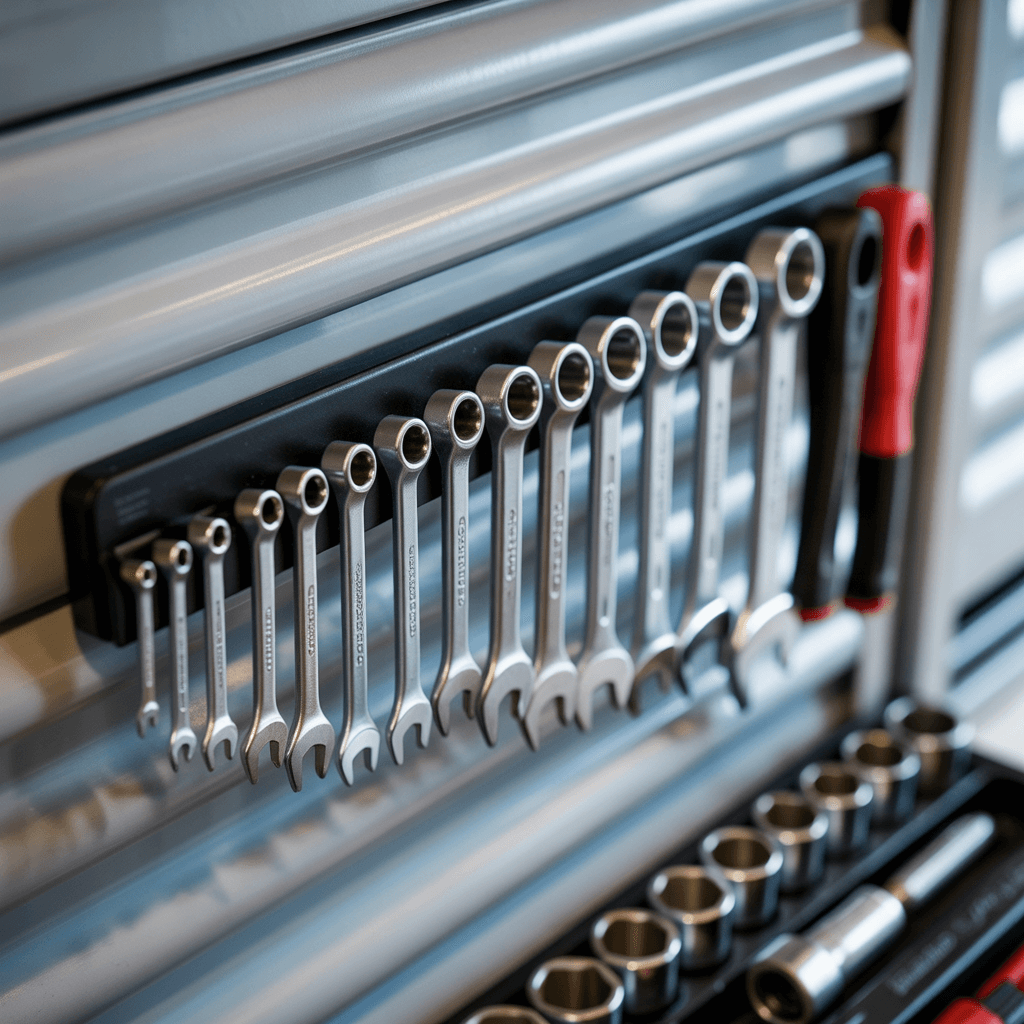
This idea is so simple it’s almost stupid. But oh, is it brilliant. Strong magnetic strips, like those used for knife storage in a kitchen, are perfect for organizing metal tools in the garage.
Why it’s a game-changer:
It’s the fastest way to put away and grab tools. No clipping, no hooking—just a satisfying thwack as the tool snaps onto the magnet. It’s perfect for items that are awkward to hang on pegboard.
Where They Shine:
Wrenches and Sockets: Instead of a bulky roll-up pouch, line your wrenches up in size order on a magnetic strip. It looks incredibly tidy.
Screwdrivers and Pry Bars: Keep them off your workbench and within easy view.
Metal Drill Bits: Never lose a bit again by sticking them to a small magnetic strip near your drill press.
A Quick Warning: Obviously, this only works for ferrous metals (stuff a magnet sticks to). Your aluminum ladder is out of luck. And for heavy tools, make sure you’re using a seriously strong magnet and anchoring it into a stud.
6. Clear Storage Bins: See Your Stuff, Save Your Sanity

This is less of a “build” and more of a “system,” but it’s the backbone of any good organization plan. Ditch the cardboard boxes. They attract pests, fall apart, and—the cardinal sin—you can’t see what’s inside.
Why it’s a game-changer:
Clear bins let you identify contents at a glance. No more pulling down ten boxes to find the Christmas lights. They’re stackable, durable, and protect your stuff from dust and moisture.
Making the Bin System Work:
Label Everything: Even with clear bins, add a label. I use a simple label maker, but even masking tape and a Sharpie work. Be specific. Don’t just write “Xmas,” write “Xmas Tree Lights & Ornaments.”
Standardize Sizes: Try to use bins of the same size and brand. They’ll stack more securely and look a thousand times better. It’s worth the investment, IMO.
Invest in Shelving: Your bins need a home. This is where those DIY shelves we talked about come in clutch. A wall of uniform bins on sturdy shelves is the ultimate garage organization flex.
7. Customizable Ceiling Hoists: For the Big, Awkward Stuff
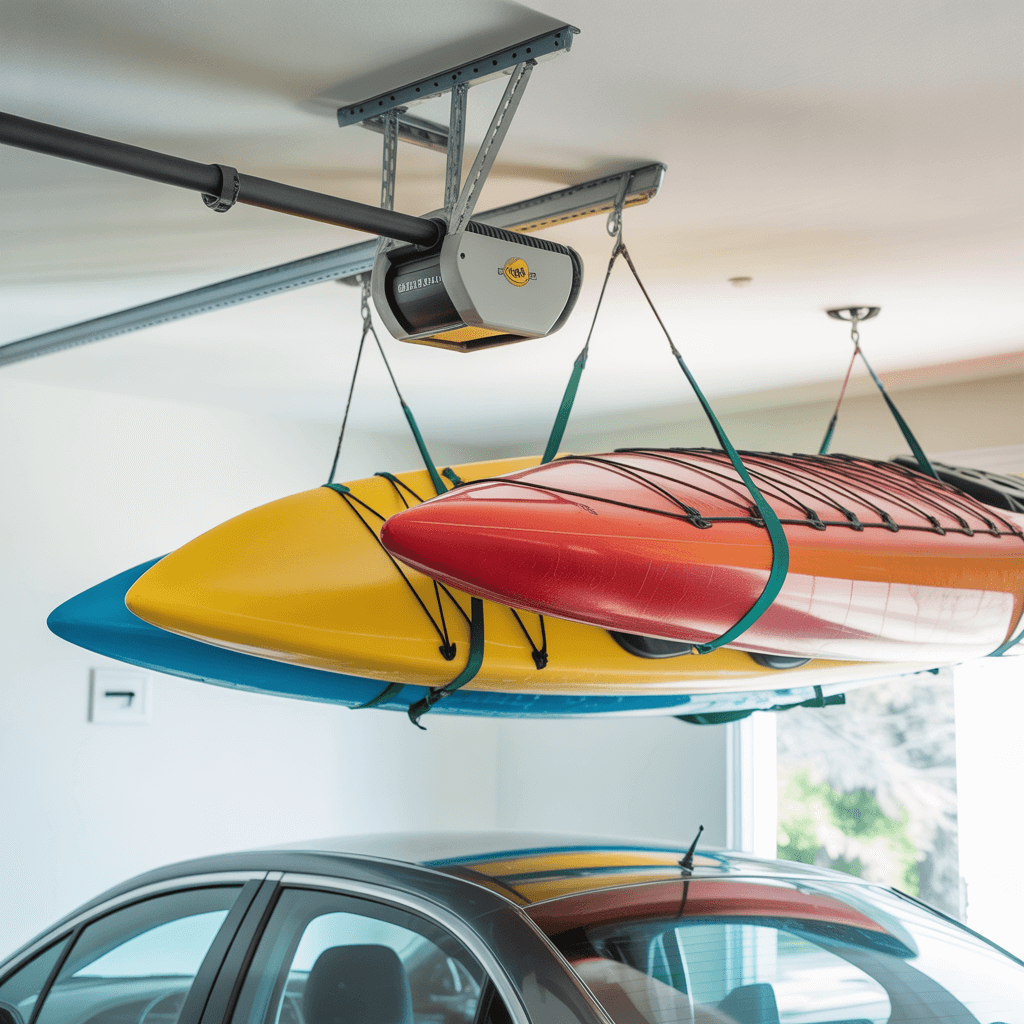
We’ve all got them: those big, clunky items that are a pain to store. Kayaks, paddleboards, ladders, even a kid’s wagon. They take up a massive footprint on the floor. Ceiling hoists solve this problem elegantly.
Why it’s a game-changer:
It uses the most underutilized space for the most inconvenient items. With a simple pulley system, you can lift heavy or bulky objects up to the ceiling and lower them down effortlessly when you need them.
How to Approach This Project:
The DIY Route: You can build a custom hoist using ropes, pulleys, and straps. This is great if you’re handy and have a specific item in mind.
The Kit Route: For most people, I’d recommend buying a pre-made hoist kit. They’re designed for safety and include all the hardware you need. Brands make kits for bikes, kayaks, and general storage.
Critical Safety Check: Just like the overhead racks, the mounting points must be secured directly into ceiling joists. The forces involved when lifting and lowering are significant. Do a periodic check to ensure all connections are tight.
Your Garage, Your Rules
So, there you have it. Seven solid ideas to take your garage from a chaotic nightmare to a functional space you might actually enjoy spending time in. The best part about DIY is that you can mix and match these ideas. Maybe you do a slat wall on one side, a pegboard above your workbench, and overhead racks for seasonal stuff.
The goal isn’t perfection. The goal is progress. Start with one project that will make the biggest difference to your daily life. Maybe that’s just getting all those tools off the floor and onto a pegboard. That alone will feel amazing.
What’s the first project you’re going to tackle? Whatever it is, you’ve got this. Now go reclaim your garage