
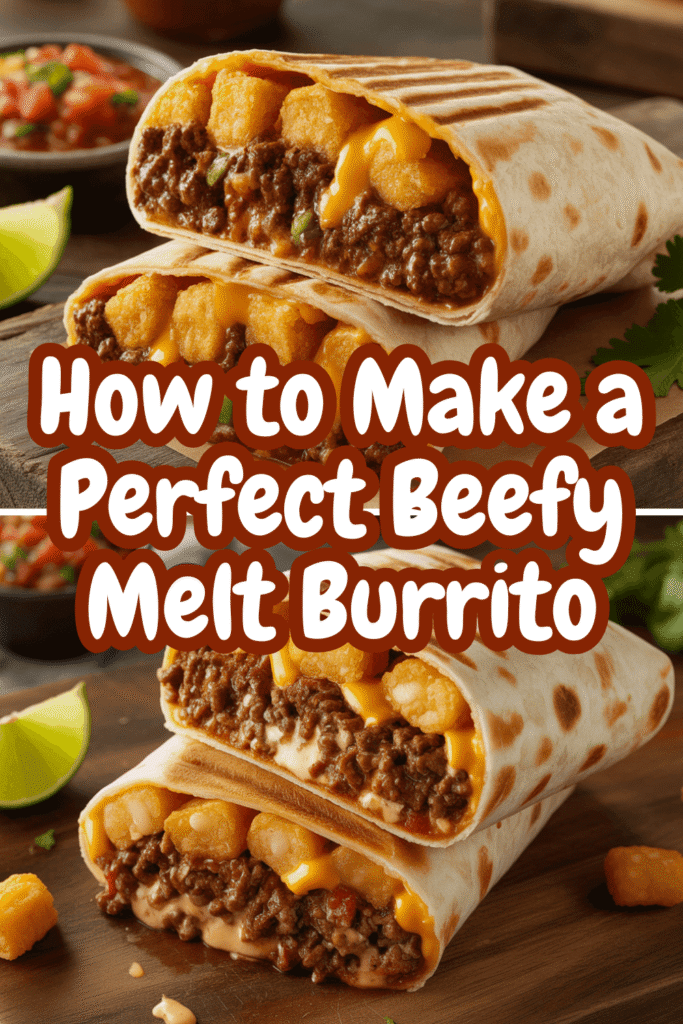
Hey there, burrito fanatic. Let’s cut to the chase. You’re not here because you want a sad, store-bought wrap that tastes like cardboard and regret. You’re here because you’re dreaming of a specific kind of burrito. You know the one. It’s packed with perfectly seasoned beef, gooey melted cheese, and just the right amount of crispy, textural magic, all wrapped up in a warm, soft tortilla. You want a beefy melt burrito that’s a full-on flavor experience.
Well, my friend, you’ve landed in the right place. I’ve made more burritos than I can count, and I’ve fine-tuned this recipe through many (very delicious) trials and errors. This isn’t just a recipe; it’s your ticket to burrito bliss. So, are you ready to level up your home-cooking game? Let’s get into it.
Why This Recipe is Your New Best Friend

Look, I get it. You could just drive through a fast-food line and have someone hand you a burrito in three minutes. But have you ever actually looked at what you’re eating? IMO, the homemade version isn’t just better; it’s a completely different league.
First off, you are the boss of the ingredients. That means no mysterious preservatives or unpronounceable chemicals. You control the salt, the spice, the quality of the beef, and the glorious, glorious amount of cheese. Want to add an extra handful of jalapeños? Go for it. Prefer a different cheese blend? You’re the captain now.
Secondly, and this is a big one, the sheer satisfaction factor. There’s something deeply rewarding about crafting this beautiful, hefty parcel of joy with your own two hands. The sizzle of the beef, the smell of the toasting tortilla… it’s a sensory experience that a paper-wrapped packet just can’t deliver.
Finally, let’s talk about the economics. Making these at home, especially if you’re feeding a family or meal-prepping for the week, is ridiculously cost-effective. You can make two, three, or even four restaurant-quality burritos for the price of one takeout version. Your wallet and your taste buds will thank you.
Gear Up: What You’ll Need in the Kitchen
You don’t need a kitchen worthy of a cooking show to pull this off. A few basic tools are all it takes to become a burrito master.
A Large Skillet or Frying Pan: This is your main workhorse. You’ll cook the beef and the filling in here. Non-stick is great for easy cleanup.
A Box Grater: For that beautifully melted, fresh-shredded cheese. Pre-shredded bagged cheese is coated in anti-caking agents that can make it a little grainy and less melty. Trust me, shredding your own is a tiny step that makes a massive difference.
A Mixing Bowl or Two: For combining your filling ingredients. Simple.
A Rubber Spatula: Your best friend for scraping every last bit of seasoned beef out of the pan. No flavor left behind!
A Cutting Board and a Sharp Knife: For prepping your veggies. A dull knife is more dangerous than a spicy pepper, so be careful 🙂
A Griddle or Another Clean Skillet: This is the secret weapon for the final step. You’ll use this to toast and seal your burrito to golden-brown perfection.
See? Nothing crazy. If you’ve got these basics, you’re already 90% of the way there.
The Cast of Characters: Ingredients You’ll Need
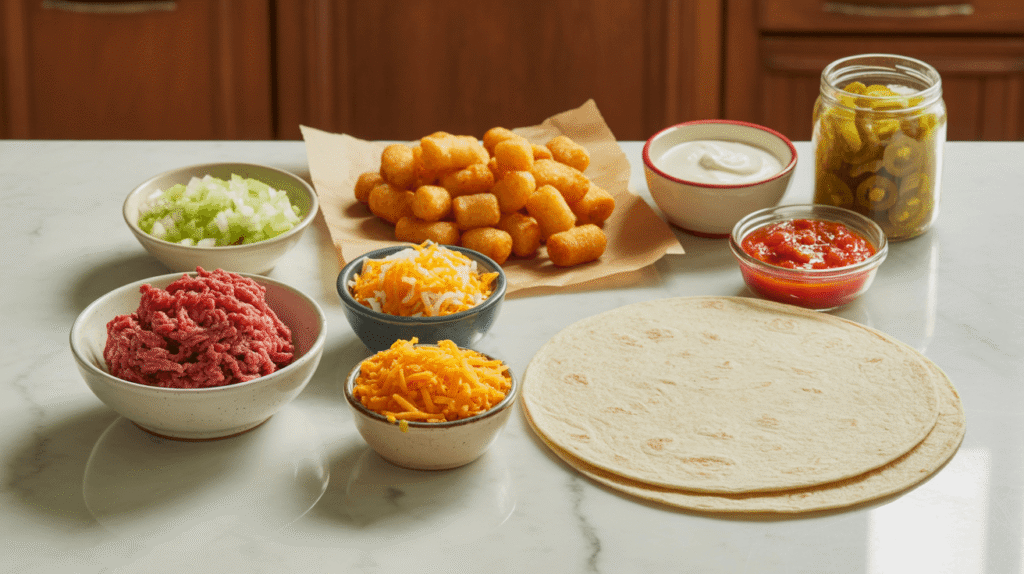
This is where the magic happens. Gathering your ingredients is like assembling your superhero team—everyone has a specific role to play. I’ve broken this down into the Filling, the Sauces, and the Wrap for clarity.
The Filling Foundation
1 pound ground beef (I prefer 80/20 for the best flavor, but leaner works too)
1 medium yellow onion, finely chopped
1 packet of taco seasoning (or 2 tbsp of your own blend of chili powder, cumin, paprika, garlic powder, and a pinch of cayenne)
1 cup of shredded cheddar cheese
1 cup of shredded Monterey Jack cheese
1 cup of crispy, cooked french fries or tater tots (Yes, you read that right. This is the “melt” magic!)
1/2 cup of sour cream
2 tablespoons of butter (for that rich, restaurant-style finish)
The Saucy & Fresh Elements
1/2 cup of your favorite salsa (I like a classic tomato-based one for this)
Optional, but highly recommended: 1/4 cup of chopped pickled jalapeños for a kick
The Mighty Wrap
2 large (12-inch) burrito-size flour tortillas
Pro-Tip: Gently warming your tortillas before you fill them is the single most important step to avoid a busted burrito. It makes them pliable and stretchy. Don’t you dare skip this!
Your Step-by-Step Guide to Burrito Glory
Alright, the prep is done. The stage is set. It’s time to make some magic. Follow these steps, and you’ll be holding a masterpiece in no time.
Step 1: The Crispy Carb Prep
If you’re using frozen fries or tater tots, get these cooking first according to the package directions. You want them golden and crispy. While they’re baking, you can get everything else ready. Think of it as efficient multitasking.
Step 2: Build the Flavor Base
Grab your large skillet and place it over medium-high heat. Add your ground beef and the chopped onion. Cook this, breaking up the meat with your spatula, until the beef is nicely browned and the onions are soft and translucent. This should take about 7-10 minutes.
Now, drain off most of the excess grease. Why? Because we want flavor, not a puddle of oil in our burrito. Once drained, sprinkle in your taco seasoning and give it all a good stir, letting those spices wake up and get fragrant for a minute.
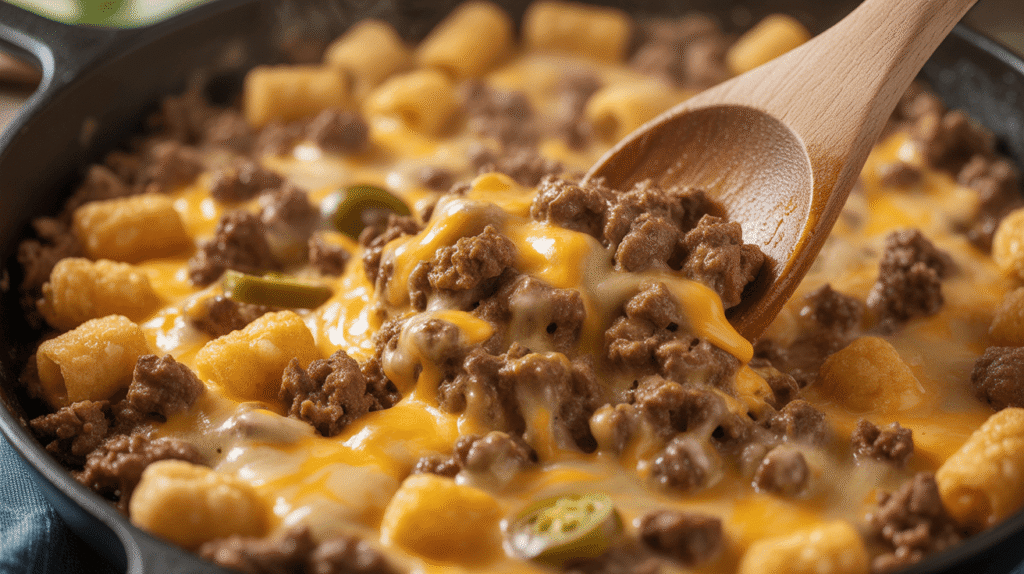
Step 3: The Creamy, Cheesy Fusion
This is the “melt” in “beefy melt.” Reduce the heat to low. To your beef mixture, add the sour cream, your shredded cheddar and Monterey Jack cheeses, and that glorious 2 tablespoons of butter. Stir everything continuously until the cheese is fully melted and the mixture becomes a cohesive, creamy, dreamy filling.
See how it’s all coming together? Now, gently fold in your crispy fries or tots and the salsa. The goal is to distribute them without completely smashing them. You want those pockets of crispy texture! Got jalapeños? Now’s the time to mix them in too.
Step 4: The Art of the Wrap
This is the moment of truth. Don’t be nervous. I believe in you.
Warm Your Tortillas: Lay a tortilla on a plate and microwave it for 15-20 seconds, or warm it for 30 seconds per side on a dry skillet. You want it warm and soft, not crispy.
Position the Filling: Pile a generous amount of your beefy filling onto the lower third of the tortilla, shaping it into a rough log. Do not overfill it. This is the most common burrito mistake! Leave about 2 inches of space on the sides.
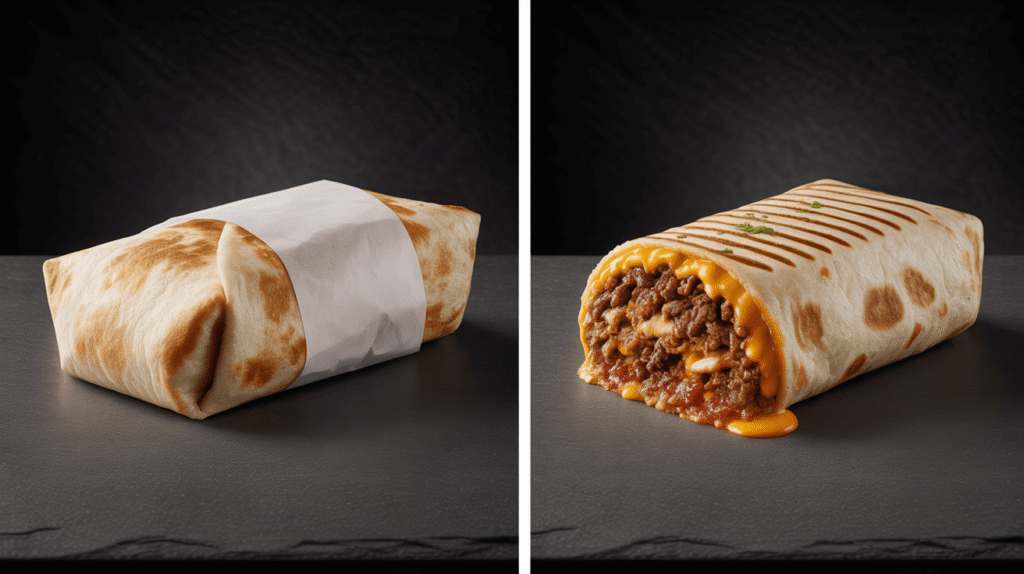
The Fold: Fold the bottom edge of the tortilla up and over the filling, tucking it in tightly. Then, fold the left and right sides inward. Now, roll the whole package forward, keeping it tight, until you have a sealed, beautiful burrito. It’s like swaddling a very delicious, food-coma-inducing baby.
Step 5: The Golden Seal of Approval
Remember that clean griddle or skillet? Heat it up over medium heat. You can add a tiny, and I mean tiny, smear of butter for extra browning, but it’s not strictly necessary.
Place your burrito seam-side down first. Let it cook for 2-3 minutes, until it’s golden brown and beautifully sealed. Then, carefully flip it and toast the other side for another 2-3 minutes. This step not only gives you that gorgeous color and slight crunch but also melts everything together into one perfect, unified package.
And there you have it. You did it. You’ve just created a beefy melt burrito that would make any fast-food joint weep with jealousy.
Let it cool for a minute (or don’t, I’m not your boss), then slice it in half diagonally to see that glorious cross-section of cheesy, beefy, crispy perfection. FYI, it pairs perfectly with an ice-cold drink and a serious sense of accomplishment.
So, what are you waiting for? Your next culinary victory is just a grocery list away. Now go forth and wrap

