
Okay, let’s be real for a second. You’re staring down the barrel of another weekend, and you’re hit with that specific, undeniable craving. It’s not just for cheesecake. And it’s not just for apple crumble. It’s for that glorious, magical, slightly absurd combination of both. Your soul is demanding a dessert that’s creamy, tangy, spiced, and crunchy all in one single, majestic bite.
Well, my friend, you’ve come to the right place. I’ve been down this path. I’ve had the triumphs (and the messy kitchen failures) so you don’t have to. This isn’t just a recipe; it’s your ticket to becoming a dessert hero. So, tie your apron, and let’s create something that will make your taste buds sing.
1. Why You Should Choose This Recipe (Seriously)
Why settle for a store-bought slice of sadness when you can make a masterpiece? IMO, this recipe is the ultimate crowd-pleaser for a few very specific reasons.
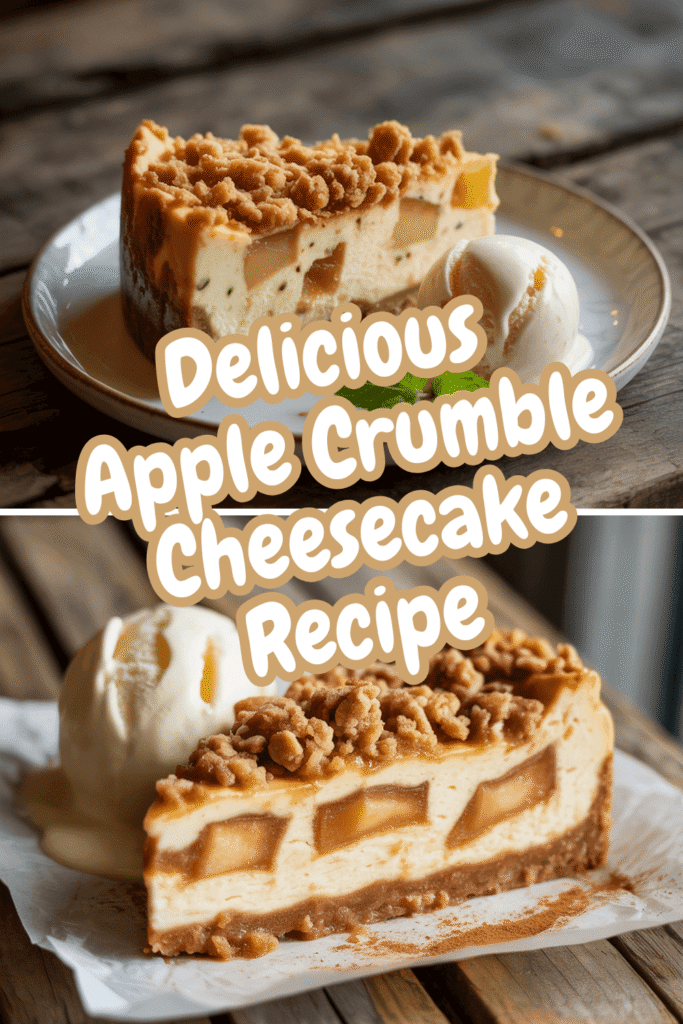
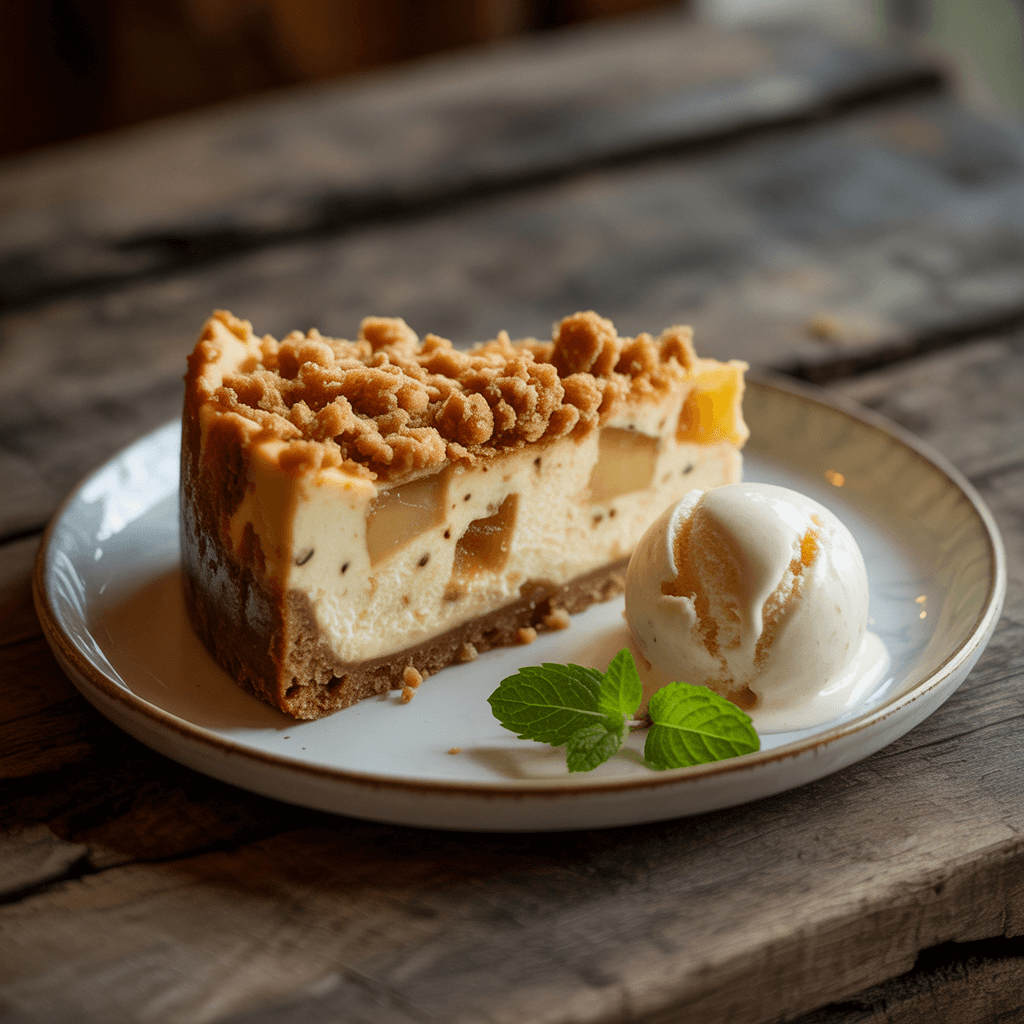
First off, it’s a total texture party. We’re talking about a buttery biscuit base, a layer of velvety, rich cheesecake, soft, cinnamon-kissed apples, and a crunchy, oat-y crumble top. Each mouthful is a journey. It’s like your fork is going on a little adventure.
Secondly, it looks incredibly impressive, but it’s secretly straightforward. There’s no finicky water bath to worry about (a common cheesecake nightmare, am I right?), and the steps are broken down so simply that even if your baking experience starts and ends with toast, you can handle this. We’re building this beauty in layers, which is way less intimidating than it sounds.
And finally, it’s versatile. Serving it warm makes the cheesecake layer extra gooey and comforting, almost like a pudding. Chilling it gives you that classic, firm, sliceable cheesecake experience. You get to choose your own adventure! Ever wondered why some desserts feel like a warm hug? This is it.
2. What You Will Need in the Kitchen (Your Baking Toolkit)
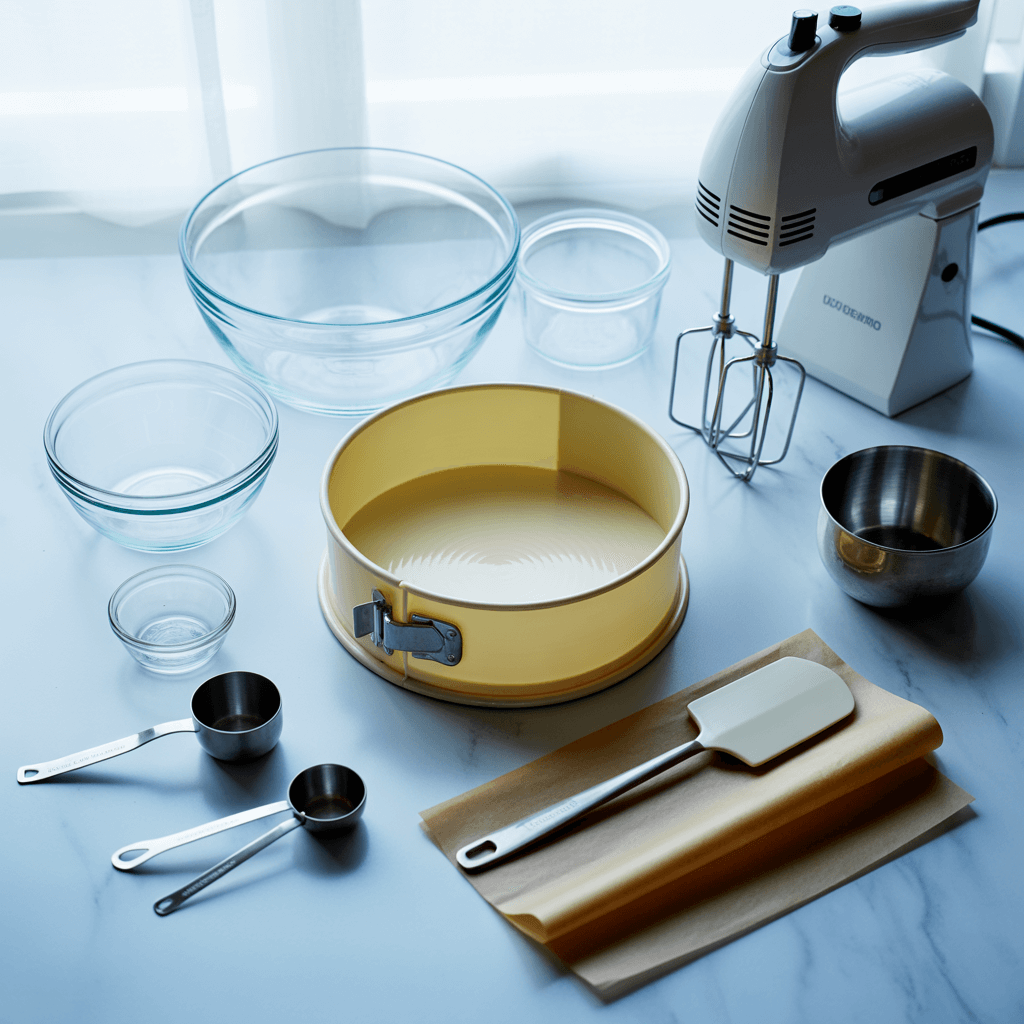
Before we get to the ingredients, let’s do a quick gear check. You don’t need any super fancy equipment, but having the right tools makes the process smooth and enjoyable.
A 9-inch Springform Pan: This is non-negotiable. It’s the pan with the clip on the side that lets you release your cheesecake without turning it into a sacrificial offering to the cake gods. If you don’t have one, go get one. They’re a game-changer.
Electric Mixer (Handheld or Stand): You could try to cream the cheese and sugar by hand, but your arm will hate you for it. An electric mixer ensures everything is beautifully smooth and lump-free. This is a hill I’m willing to die on.
Large Mixing Bowls: You’ll need a couple. One for the base, one for the filling, one for the apples, one for the crumble… you see where I’m going with this.
Parchment Paper: For lining the bottom of your springform pan. This little step is the insurance policy against a stuck base. Don’t skip it.
Measuring Cups and Spoons: Baking is a science, my friend. Accuracy is key.
Spatula: For scraping every last bit of that delicious filling into the pan. Waste not, want not!
3. Ingredients You Are Going to Need (The Shopping List)
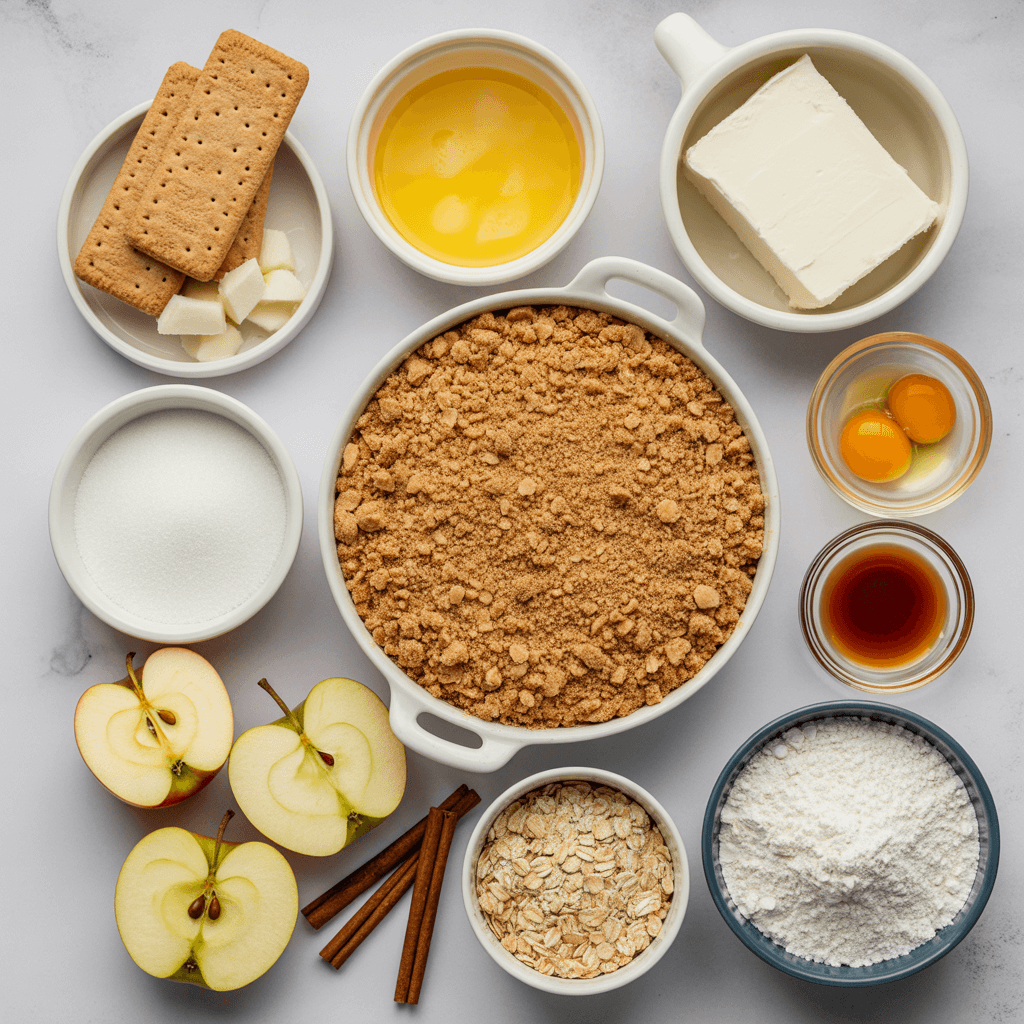
Alright, here’s the star of the show: the grocery list. I highly recommend getting your ingredients to room temperature before you start, especially the cream cheese and eggs. It makes for a much smoother, happier filling. Trust me on this.
For the Biscuit Base:
200g (about 2 cups) of Digestive Biscuits or Graham Crackers. (Digestives give a richer, maltier flavour, which I prefer.)
100g (7 tablespoons) of Unsalted Butter, melted.
1 tablespoon of Brown Sugar.
For the Cheesecake Layer:
500g (about 17.5 oz) of Full-Fat Cream Cheese, at room temperature. (This is not the time for the low-fat version. Go big or go home.)
150g (¾ cup) of Caster Sugar (or just blitz regular granulated sugar in a blender for a few seconds).
2 Large Eggs, at room temperature.
1 teaspoon of Vanilla Extract.
120ml (½ cup) of Sour Cream or Greek Yogurt. This adds a wonderful tang and keeps the texture lush.
For the Apple Crumble Layer:
3-4 Medium Apples (I love a mix of Granny Smith for tartness and Braeburn for sweetness).
1 tablespoon of Lemon Juice.
2 tablespoons of Brown Sugar.
1 teaspoon of Ground Cinnamon.
A pinch of Nutmeg (freshly grated if you’re feeling fancy).
For the Crumble Topping:
75g (¾ cup) of Plain Flour.
50g (½ cup) of Rolled Oats.
75g (⅓ cup) of Brown Sugar.
1 teaspoon of Cinnamon.
75g (5 tablespoons) of Cold Unsalted Butter, cubed.
See? No weird, hard-to-find ingredients. Just good, honest stuff that makes magic happen.
4. Your Step-by-Step Guide to Dessert Glory
Take a deep breath. The fun part starts now. I’ll walk you through each stage. Read through all the steps once before you begin—it’s like scouting the route before a road trip.
Step 1: The All-Important Base
First things first, preheat your oven to 160°C (320°F). Grab your springform pan and line the bottom with a circle of parchment paper. Don’t bother greasing the sides.
Now, for the biscuits. You need to turn them into crumbs. My favourite low-tech method? Chuck them in a zip-top bag and go at them with a rolling pin. It’s a great stress reliever. Pour the crumbs into a bowl, add the tablespoon of brown sugar, and stir in the melted butter. It should look like wet sand.
Press this mixture firmly and evenly into the bottom of your prepared pan. I use the bottom of a flat glass to really tamp it down. A firm base is a stable base! Pop this in the oven for 10 minutes. Then, take it out and let it cool while you prepare the rest.
Step 2: The Spiced Apple Layer
While the base is baking, peel and core your apples. Chop them into small, bite-sized chunks—about 1cm cubes. Toss them immediately in a bowl with the lemon juice to stop them from browning.
Add the brown sugar, cinnamon, and nutmeg, and mix until every apple piece is coated. You’ll smell the future deliciousness already. Set this bowl aside for now. We’re not cooking the apples first; they’ll bake perfectly inside the cheesecake.
Step 3: The Dreamy Cheesecake Filling
In a large bowl, beat the room-temperature cream cheese with your electric mixer until it’s completely smooth and lump-free. Scrape down the sides of the bowl. This is the most crucial step for a silky texture—no one wants a lumpy cheesecake.
Gradually beat in the caster sugar until it’s fully incorporated. Then, add the eggs, one at a time, beating well after each addition. Finally, mix in the vanilla extract and sour cream (or yogurt). Beat until just combined. Over-mixing at this stage can incorporate too much air and cause cracking. We want it smooth, not fluffy.
Step 4: The Crumble Topping
In a separate bowl, make the crumble. Whisk together the flour, oats, brown sugar, and cinnamon. Now, add the cold, cubed butter.
Using your fingertips, rub the butter into the dry ingredients until the mixture resembles coarse breadcrumbs. You want some bigger lumps for extra crunch! Pop this bowl in the fridge to keep the butter cold until you need it.
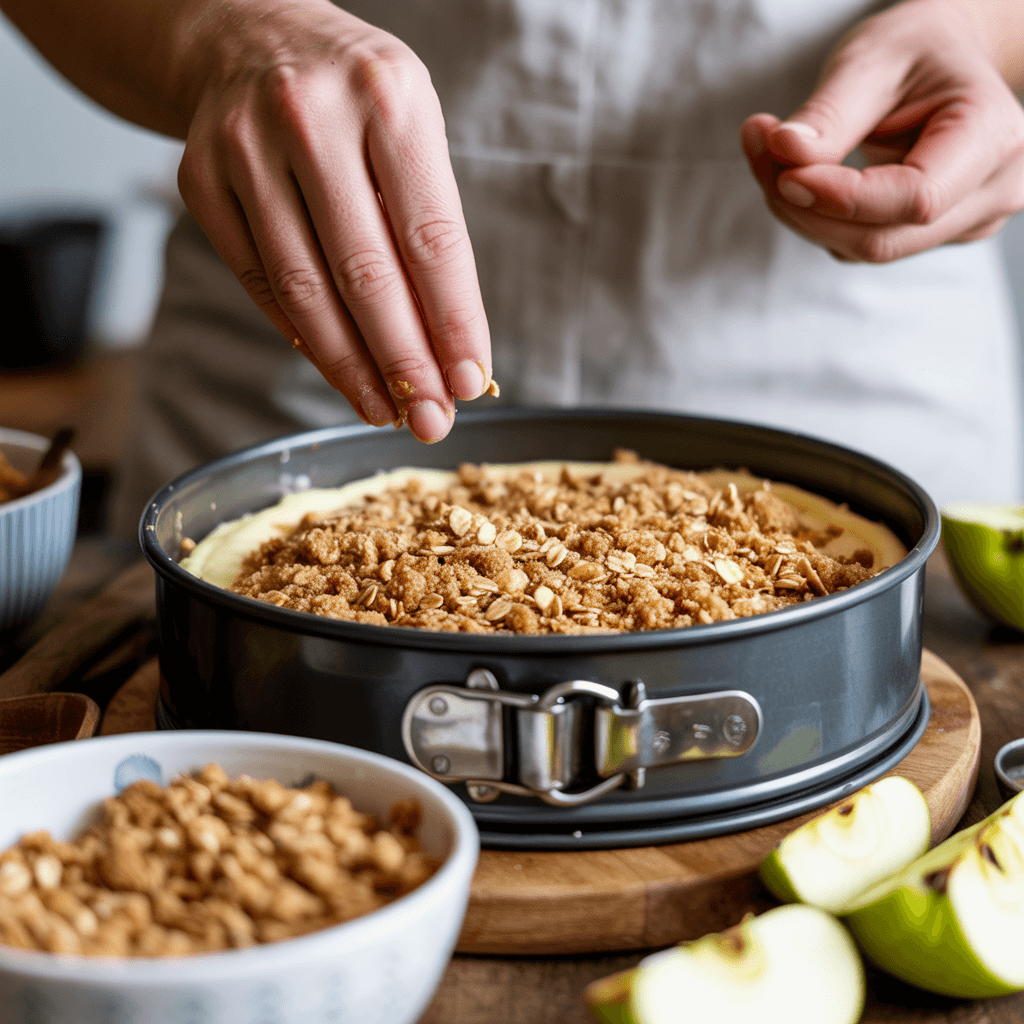
Step 5: The Grand Assembly (This is Where the Magic Happens)
Time to build our tower of power! Your setup should be: cooled base, bowl of cheesecake filling, bowl of spiced apples, and bowl of chilled crumble.
-
Pour all of the cheesecake filling onto the biscuit base and spread it out evenly.
-
Evenly scatter the spiced apple chunks over the top of the cheesecake layer. They will sink a little, and that’s totally fine.
-
Take your crumble topping from the fridge and sprinkle it over the apples, covering the entire surface.
Step 6: Baking to Perfection
Place your magnificent creation in the preheated oven (remember, 160°C/320°F) for about 50-60 minutes. The top should be golden brown, and the edges of the cheesecake should be set, but the center should still have a slight wobble to it. This is the secret—it continues to cook as it cools.
Turn off the oven, crack the door open slightly, and let the cheesecake cool inside for an hour. This gradual temperature change is the best trick to prevent major cracking. After an hour, take it out and let it cool completely on a wire rack.
Step 7: The Final Test (The Hardest Part)
Once it’s fully cool, cover it with cling film and refrigerate for at least 4 hours, but ideally overnight. I know, the wait is torture. But this resting time allows the flavours to meld and the texture to become perfectly firm, making it easy to slice.
When you’re ready to serve, unclip the springform pan, slice it up, and prepare for the compliments to roll in. FYI, it’s incredible with a drizzle of warm caramel sauce or a dollop of freshly whipped cream.
So, there you have it. Your guide to conquering the apple crumble cheesecake. It’s a project, sure, but it’s one of the most satisfying bakes you’ll ever do. You’ve got this! Now, go forth and bake. And when someone asks you for the recipe, you know where to send them

