
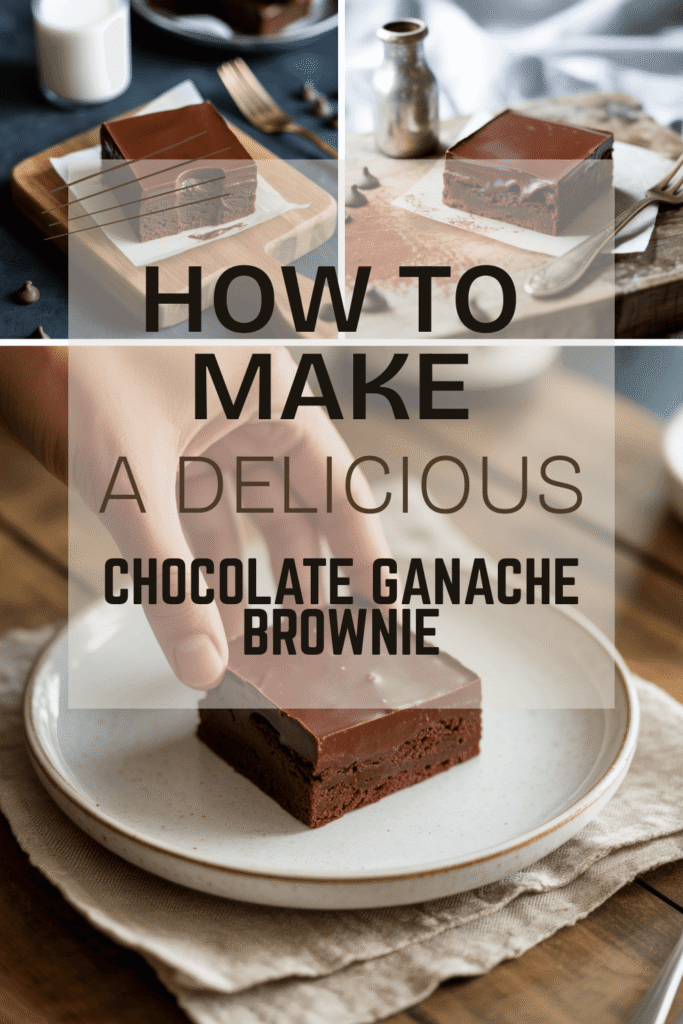
You know that moment. You’re craving something chocolatey, but not just any chocolate thing. A cookie is too small. A slice of cake feels too formal. You need something dense, deeply chocolate, and unapologetically decadent. You need a brownie. But not just a brownie—you need a brownie that’s a total showstopper. You need a brownie topped with a layer of silky, glossy, mind-blowingly smooth chocolate ganache.
Friend, you have come to the right place. I’ve been there, staring into the pantry, willing a dessert masterpiece to appear. I’ve had my share of cakey disappointments and fudgy triumphs. And I’m here to tell you that making the ultimate chocolate ganache brownie isn’t just easy; it’s a life-changing skill. Let’s get you away from that boxed mix and into dessert-heaven. Trust me, your future self (and anyone you share these with) will thank you.
1. Why This Recipe is Your New Best Friend
Okay, before we even preheat the oven, let’s talk about why this specific recipe is the one you should commit to memory. IMO, a great recipe is like a good friend: reliable, doesn’t require a huge fuss, and always makes you feel good.
It’s the Texture, Honestly
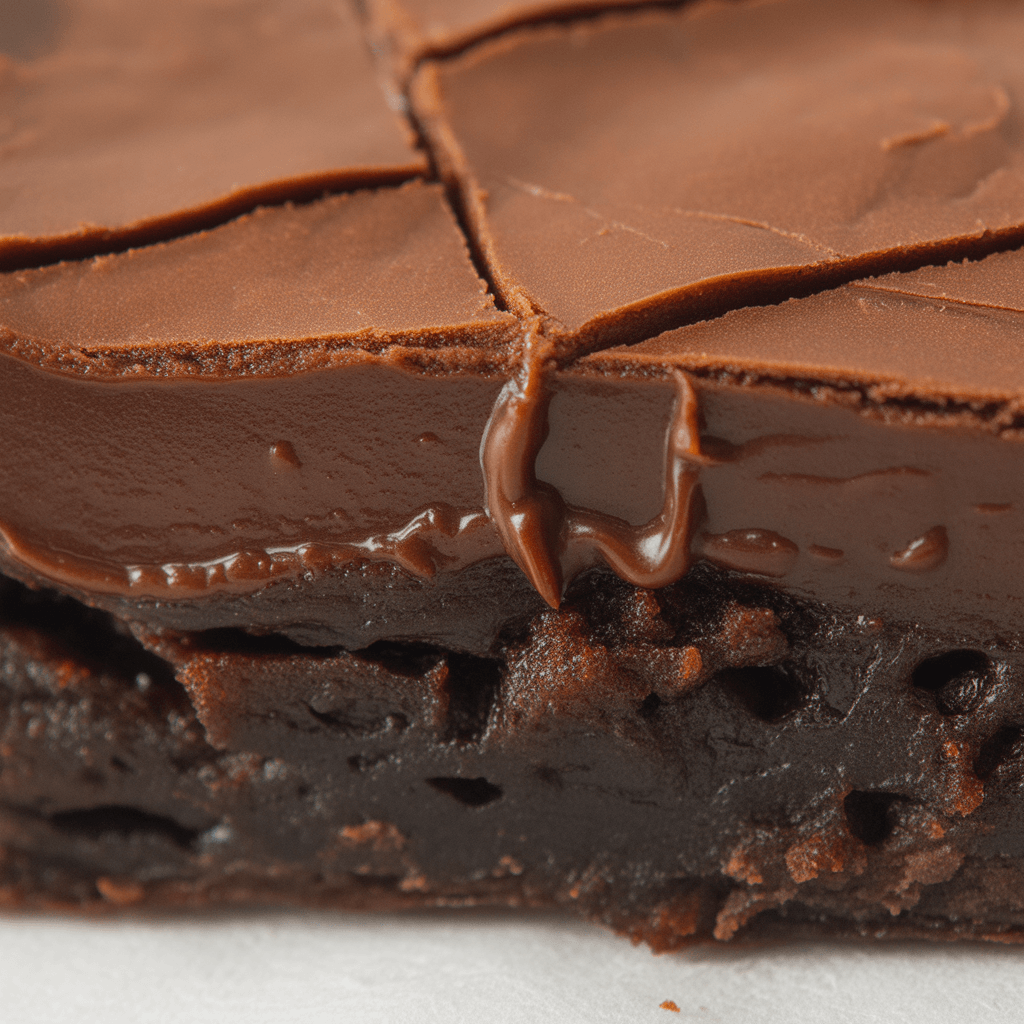
This recipe is engineered for a dense, fudgy, and moist crumb. We are not making chocolate cake here. If you want cake, bake a cake. This is for when you need that rich, almost-gooey experience that makes you close your eyes for a second after the first bite. How do we achieve this? A higher fat-to-flour ratio and an extra egg yolk. Simple, but oh-so-effective.
Simplicity is Key
Ever see a recipe with three different bowls and a million steps and just nope right out of there? Me too. This is a one-bowl situation (well, plus a saucepan for the ganache, but that’s basically cheating it’s so easy). You don’t need a stand mixer or any fancy equipment. Just a bowl, a whisk, and a spatula. It’s practically foolproof.
The Ganache is a Game Changer
A good brownie is great. A brownie slathered in a thick layer of homemade chocolate ganache is legendary. It takes it from a humble snack to a dessert you’d proudly serve at a dinner party. Plus, making ganache feels fancy, but it’s literally two ingredients. You’ll feel like a pastry chef, I promise.
2. Gearing Up: Your Kitchen Toolbox
You don’t need a Top Chef-worthy kitchen for this. Let’s take a quick inventory of what you’ll need. Chances are, you already have most of this.
The Essential Hardware
An 8×8 Inch Baking Pan: This is the perfect size for getting that ideal brownie thickness. If you only have a 9×13, you can use it, but your brownies will be thinner and will bake faster, so keep a close eye on them.
Parchment Paper: This is non-negotiable for me. It guarantees perfect, easy release every single time. No more brownies stuck in the pan. You can also use aluminum foil, but parchment is my MVP.
A Medium-sized Mixing Bowl: For the brownie batter. Glass, metal, ceramic—it doesn’t matter.
A Small Saucepan: For melting butter and, later, for making the ganache.
A Whisk and a Spatula: Your dynamic duo for mixing and making sure you get every last bit of batter out of the bowl.
A Heatproof Bowl: For the ganache. A glass or ceramic bowl that can sit on top of your saucepan without touching the water below is ideal.
Measuring Cups and Spoons: For, you know, measuring. 🙂
The Nice-to-Haves
A Kitchen Scale: I’m going to say it: weighing your ingredients (especially flour) is the secret to consistent baking. It’s more accurate than cup measurements. If you have one, use it! If not, no sweat—just make sure you spoon your flour into the measuring cup and level it off instead of scooping directly from the bag.
A Cooling Rack: Essential for letting your brownies and ganache cool properly.
3. The Ingredients: A Shopping List for Bliss
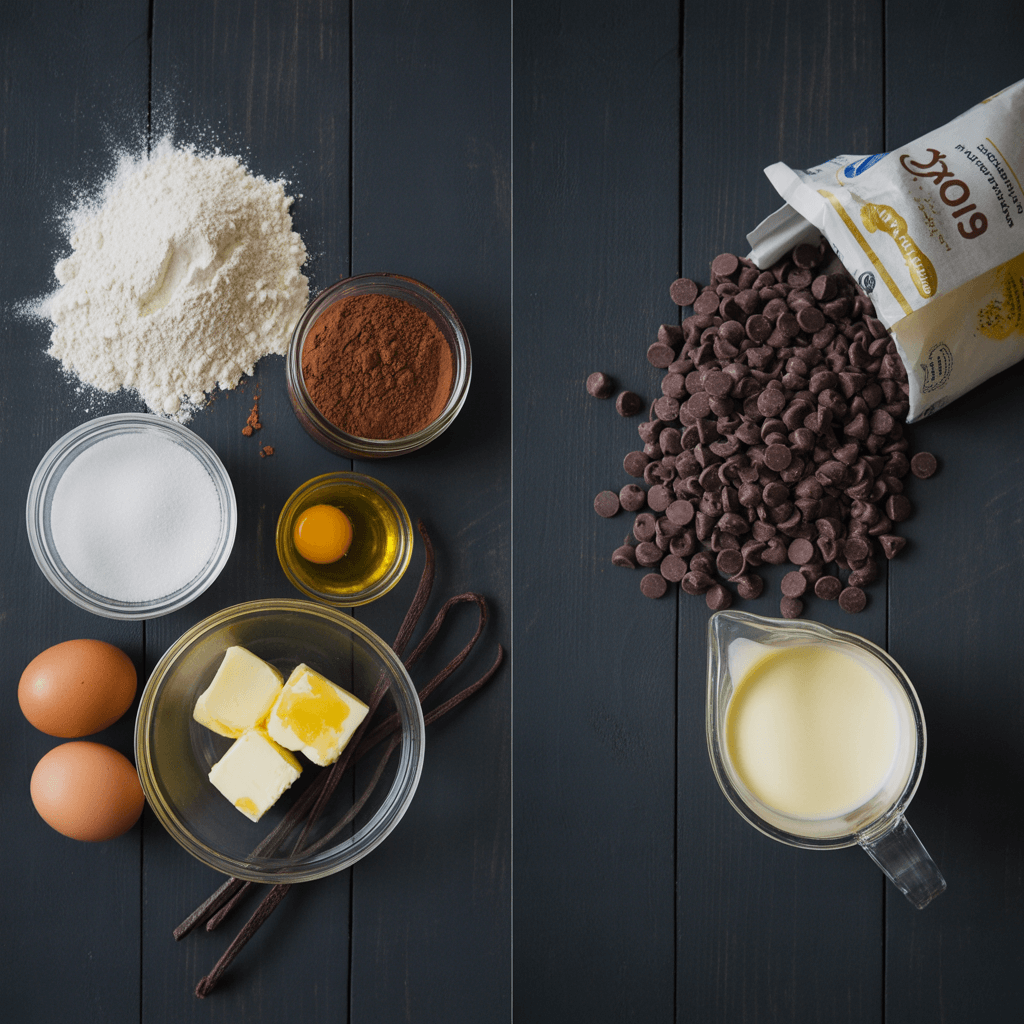
Here’s where the magic happens. Using good-quality ingredients makes a difference, but don’t stress! This is about making something delicious, not bankrupting yourself at a specialty food store.
For the Brownie Layer:
½ cup (1 stick / 113g) Unsalted Butter: I use unsalted so we can control the salt level. If you only have salted, just reduce the added salt in the recipe by a quarter teaspoon.
1 cup (200g) Granulated Sugar: This sweetens the deal and helps create that shiny, crackly top we all love.
2 Large Eggs + 1 Egg Yolk: Remember that extra yolk I mentioned? This is it. It adds richness and fudginess without making the batter too cakey.
1 teaspoon Vanilla Extract: Use the real stuff if you can! It adds a beautiful depth of flavor.
⅓ cup (30g) Unsweetened Cocoa Powder: This is the primary chocolate flavor, so use a good one! I’m a fan of Dutch-processed for a smoother taste, but natural unsweetened works perfectly here too.
½ cup (63g) All-Purpose Flour: The structural backbone. Don’t over-measure it!
¼ teaspoon Salt: Crucial for balancing the sweetness and making the chocolate flavor pop.
¼ teaspoon Baking Powder: Just a tiny bit gives a little lift without making it cakey.
For the Chocolate Ganache Topping:
1 cup (175g) Semi-Sweet Chocolate Chips or Chopped Chocolate: The quality here is key. Use a chocolate you enjoy eating on its own. I prefer semi-sweet for a balanced sweetness, but dark chocolate works wonderfully if you’re a fan.
½ cup (120ml) Heavy Cream: Also called double cream or whipping cream. This is what we’ll heat up and pour over the chocolate to create that silky sauce.
See? Nothing crazy. Now, are you ready to actually make these? Let’s do this.
4. The Step-by-Step Guide to Brownie Nirvana
Follow these steps, and you really can’t go wrong. I’ve included all my little tips and tricks that I’ve learned from (ahem) occasional failures.
Step 1: Prep Your Pan Like a Pro
First things first, preheat your oven to 350°F (175°C).
Now, take your 8×8 pan and line it with parchment paper. I like to cut a strip that’s a bit wider than the pan so it hangs over two opposite sides. This creates “handles” that will let you lift the entire brownie slab out later. It’s a game-changer for clean cutting. Lightly grease the parchment or spray it with a little cooking spray for extra insurance.
Step 2: Make the Brownie Batter (It’s So Easy)
-
Melt the Butter: In your saucepan over low heat, melt the stick of butter. Don’t let it brown! Just melt it until it’s liquid. Take it off the heat as soon as it’s melted.
-
Mix in Sugar and Eggs: Pour the melted butter into your mixing bowl. Whisk in the granulated sugar. Then, add the two eggs, the extra egg yolk, and the vanilla extract. Whisk it all together until it’s smooth and looks a little shiny.
-
Add the Dry Ingredients: Now, dump in the cocoa powder, flour, salt, and baking powder right on top of the wet ingredients. Seriously, just put them all in. Gently whisk it just until everything is combined and you don’t see any more dry flour pockets. Do not overmix! Overmixing is the enemy of fudgy brownies; it develops the gluten in the flour and makes them tough. A few small lumps are totally fine.
Step 3: Bake to Fudgy Perfection
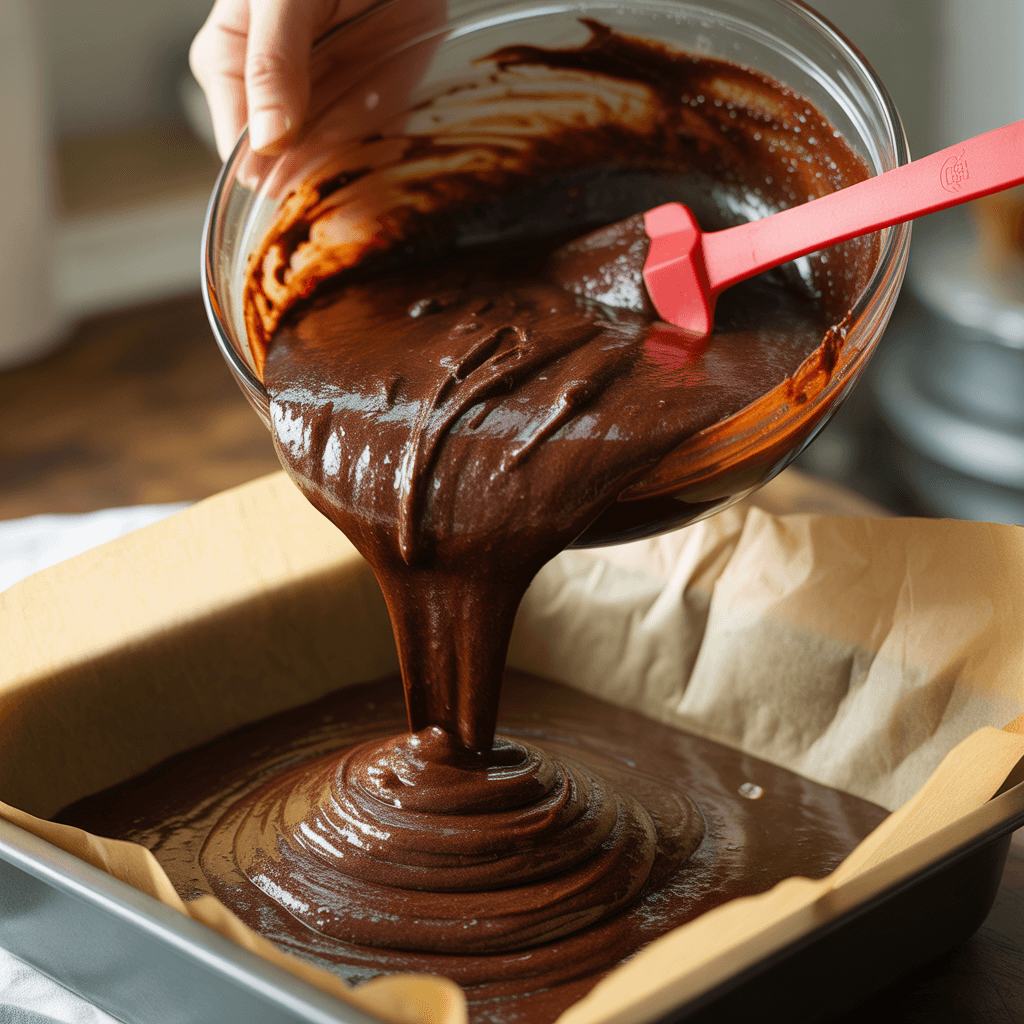
Pour the beautiful, dark batter into your prepared pan and use your spatula to spread it into an even layer.
Pop it into the preheated oven and bake for 20-25 minutes. Now, here’s the most important part: you want to slightly underbake these. The secret to a fudgy center is taking them out when a toothpick inserted into the center comes out with a few moist crumbs clinging to it, not completely clean. If the toothpick is wet with raw batter, they need more time. If it’s clean, they’re probably already overdone and will be more cakey. Start checking at 20 minutes.
Step 4: The Grand Finale – The Ganache
While the brownies are baking and cooling, let’s make the magic happen.
-
Place the Chocolate: Put your chocolate chips or chopped chocolate into your heatproof bowl.
-
Heat the Cream: Pour the heavy cream into your clean saucepan and heat it over medium heat until it just starts to simmer. You’ll see little bubbles forming around the edges. Don’t let it boil vigorously!
-
Combine and Wait: Immediately pour the hot cream over the chocolate. Just let it sit there for a minute or two. Walk away. I’m serious! This quiet time allows the heat from the cream to gently melt the chocolate.
-
Whisk to Smoothness: After a couple of minutes, start whisking slowly from the center outward until the mixture is completely smooth, glossy, and gorgeous. Congrats, you just made ganache! See? I told you it was easy.
Step 5: The Assembly (and the Hardest Part)
Once the brownies are out of the oven, place the entire pan on a cooling rack. Let them cool completely. I know, it’s torture. But if you pour the ganache onto a warm brownie, it will melt and become a messy puddle. We want a distinct, beautiful layer.
Once the brownies are at room temperature, pour the slightly cooled ganache over the top and spread it into an even layer with your spatula.
Now for the final test of your willpower: you need to let the ganache set. You can leave them at room temperature for a couple of hours, or—my preferred method—pop the whole pan into the refrigerator for about 30-60 minutes to speed things up. This gives the ganache a perfect, firm-but-silky texture.
Step 6: The Grand Finale – Cutting and Eating
Use those parchment paper handles to lift the entire brownie block out of the pan onto a cutting board. For the cleanest cuts, use a large, sharp knife. Pro tip: wipe the knife clean with a hot towel between each cut. It makes a huge difference and gives you those pristine, bakery-style squares.
And there you have it. You’ve just created a masterpiece. A dense, fudgy brownie enveloped in a layer of pure chocolate silk. Go on, take a bite. You’ve earned it. Wasn’t that so much better than a boxed mix?
FYI, these keep beautifully in an airtight container at room temperature for a couple of days, or in the fridge for up to a week (if they last that long). Enjoy

